Wednesday, March 31, 2010

General bodywork preventative maintenance


On the hottest, driest day of the summer it is a good idea to remove the seats, carpets and interior trim from the car, and to give as much of the newly exposed metal as possible anti-corrosion protection.
A thin coating of a moisture-inhibiting wax or oil may be applied under footwell rubber mats to protect the floor and heater channel sections. Even with this protection. if the carpets (where fitted) get wet then they should immediately be removed and dried out.
Chrome work presents special problems. The tiniest pin-hole will enable rust to become established under the surface of the chrome, and it spreads unseen until large areas begin to 'bubble' and eventually, to flake off. New chrome work can be polished to provide some protection, but because the bumpers and other items with a chrome finish are vulnerable to stone chipping, there remains very little which can be done in the way of long term protection. The non-chromed side of such fittings does benefit from either wax or oil protection.
Where small chrome fittings meet painted bodywork, problems with rusting can arise. The chrome light surrounds and other fittings are all able to trap and hold water in contact with the bodywork, and furthermore, the bodywork paint is often breached as the pieces of trim are fitted into place. Wax or oil may be used to help prevent this if care is taken not to allow either to run onto surrounding paintwork.

Arresting rust


is discovered on thin body metal or even on sturdy chassis or suspension components there are two options for dealing with it. Preferable is the complete removal of all traces of rust from the surface of the metal, followed by primering and top-coating. This can be a time-consuming process, however, and many people prefer to utilise rust arresting products. Sometimes, the body panel metal can be so badly rusted and thin that completely removing the rust might result in a hole. In such circumstances a good rust arresting product can help to prolong the life of the metal, provided that it is not a structurally important panel.The car accessory market usually offers a wide range of chemical treatments which are all 'guaranteed' to arrest existing rust and ensure that the metal never rusts again. Not all appear to actually work in the experience of the author and also according to various published reports of independent testing. Rather than list the many products which do not reportedly work, the two which in the author's experience do work and which he uses are Bondaglass Gloss 'Bonda Prima' and Dinitrol RC800.
Unlike many other products, Bonda Prima is notclaimed to chemically alter the composition of rust. The jil it i.s it is to ire y to er ody ked ad id redmanufacturers state that it works by infiltrating and encapsulating rust particles in a resin. Dinitrol RC800 converts rust into an inert organic compound which can be primed. Both certainly work.
In order to work properly, rust arresters should be applied only to flake-free, grease-free and dry surfaces, which should ideally have no more than a thin coating of corrosion.
It is useless, incidentally, to use any rust arresting primer on metal which is to be filled. If you are straightening out a dent, for instance, then you have to remove all traces of rust before applying the filler straight onto clean metal, because if you were to apply a rust-resistant primer first then the filler would adhere strongly only to the primer, which does not itself possess sufficient adhesion to the metal, and both filler and paint will drop off in next to no time. If you apply filler over rusted metal, the rust will rapidly spread underneath the filler, which will eventually drop out.
To arrest rust, you should begin by thoroughly cleaning and de-greasing the section in question. When it has dried then it may be firstly wire-brushed and finally rubbed with emery cloth or paper in order to remove any loose rust and to key the surface. Follow the instructions with whichever product you choose to the letter. in the case of Dinitrol RC800. this entails merely painting on one or more coats (12 hours between coats) and then applying any primer paint. The work should be carried out in a warm, dust-free and dry building if possible; otherwise on a hot and dry day outside. Bonda Prima is available in a spray can or a tin for brushing or spraying with a compressor. After treatment, cellulose should be applied either within 6 to 24 hours or after seven days; other paints may be applied after four hours.
0
d ItAreas which can really benefit from rust arresting maintenance are those body panels on the underside of the car, such as the heater channel closing panels and the floorpans. If underseal on such panels shows any signs of lifting then the following can greatly increase their life-span (assuming that they have not rusted right through).
;eFirstly, all traces of old underseal and paint have to be removed. The easiest way in which to achieve this is to scrape away the undersea] and then use paraffin and a rag to remove the remnants. You can use an electric drill (or an air drill powered by a compressor) fitted with one of a selection of wire brushes and 'flap wheels' or, alternatively, an angle grinder fitted with a cup brush. Beware the lengths of wire which become detached from the cup (which rotates at 10,000 or more rpm) and fly off at high speed – but these will tend to rip away filaments of underseal which stick to whatever they hit. Protective clothing, especially goggles, must be worn to avoid personal injury from flying rust flakes and the aforementioned lengths of wire from cup brushes. If the panel being treated is anywhere near the petrol tank then this should firstly be removed.
Next, as much rust as possible should be removed using emery cloth or paper (to work right into corners) in addition to the drill and wire brushes and flap wheels. No more than a very thin coating of rust should remain.. Apply the rust arrester, followed by a second coat and a topcoat at the recommended intervals. Underseal may then be re-applied if desired to finish the job.

Preventing rust


Whenever a replacement panel which is a part of a box section has to be welded into position, the opportunity should be taken to give as much protection first to the side which will end up inside the section. Obviously, the area of metal which is to be the actual join will have to be cleaned bright and de-greased, but most of the panel can be treated to several layers of primer. Some of this paint protection will probably burn off during the welding process, but any protection is better than none.
The maximum protection against rusting will be gained by using one of the better 'rust arresting' primers rather than normal primer. In the author's experience, the rust-arresting primer previously mentioned also performs very well on clean metal; better, in fact, than normal primers.
The Beetle has a number of box sections, most of which can (and usually do) rust from the inside. When a panel or panels from a box section is repaired the opportunity to give further protection to the metal should not be missed. As soon as the welding is finished and the metal has cooled, a wax-based product such as Dinitrol 3125 should be applied. This will often entail drilling a % in. hole in order to gain access to the enclosed section, and the hole should afterwards be sealed with a rubber grommet.
The wax is applied either with one of the hand pumps supplied by the manufacturer or via a compressor-driven 'paraffin' or underseal spray gun. When cold, most wax-based products are of too thick a consistency to spray properly, and so they should be warmed until they become thin enough by standing the tin in a bowl of hot water. A cheap though less effective alternative to wax is old sump oil, which will have to be thinned in order to get a fine spray and to which some people add a little creosote.
Underneath the car, not only the bodywork but also items from the suspension benefit from protection against corrosion. There are various ways in which the suspension and associated components may be protected.
If the underside of the car is steam cleaned, then components previously covered in a layer of mud will be revealed to possess a covering of rust underneath. It is not always practical to clean and re-paint such components nor to partially clean and then use a proprietary rust arrester. Many people slow the corrosive process in such cases by painting on old engine oil.When oil is applied to a ferrous surface, it spreads to form a thin protective layer which offers the considerable advantage of remaining 'self healing' for a period of time—that is, as if the layer is breached by ascratch then the oil will again spread to re-cover it as long as it remains thin enough to do so. In time, the oil not only thickens of its own accord but also because it is absorbed by dirt, so that in order to work consistently the process should be repeated from time to time. If oil is used thus then be very careful not to let any come into contact with the brakes.
Proprietary wax products such as Dinitrol 3125 are used by many in place of oil (which can be very messy to apply), mainly in the protection of the underbody. Waxes remain reasonably fluid during the summer months and so can be self-healing, but in colder winter climates this will not happen.
Underseal is the usual product utilised for underbody protection. It is a very thick substance which can go some way towards absorbing the impact of stones kicked up by the road wheels which would otherwise expose bare metal to the elements. Underseal forms a thick and hard 'skin' over the metal, and here lies its greatest drawback. Any rust which exists before the application of underseal or rust which forms afterwards can spread rapidly and virtually unopposed, unseen under the surface of the underseal.
Underseal works best on new panels which already have some form of rust protection, and is best considered a form of protection for the actual anti-rust protection.

General care


In order for metal to rust it needs only to be exposed to the slightest amount of moisture (including moisture in humid air). Paint scratches and chips which expose bare metal will obviously permit this to happen, and so any such breaches of the paintwork should receive immediate attention, preferably before any moisture which comes into contact with the metal has sufficient time to let rust gain a foothold.
te
T mly her the Ike
?,s
eVery shallow scratches which do not go through to the metal may be gently cleaned out and hand painted with a small brush. If bare metal has been exposed (to all intents and purposes corrosion begins the moment metal comes into contact with air which contains moisture) then it is usually best to take a small area of the surrounding paintwork down with wet 'n' dry (used wet) to reveal a little more metal than was originally exposed. The existing paint at the edges should be `feathered', that is, there should not be a discernible shoulder around the area. This should be dried and thoroughly de-greased before being treated with Bondaglass Voss 'Ronda Prima' or a similar rust-retarding paint. Use of this product should stop any tiny traces of rust which remain on the surface of the metal from spreading. If necessary, high-build primer can then be applied and flatted down before top coating. Before applying any paint or rust-resistant product, check that it is compatible with the existing surrounding paintwork of the car. Do not use cellulose-based products on other types of paint, because the powerful thinners will lift them.
isis. :d a ble -ays tonOld paintwork will usually be faded, so that the new paint stands out from the surrounding area. If this is the case then cutting the old and new paint (allowing a suitable period for the new paint to harden first: which varies according to the type of paint used) with a proprietary mild cutting compound will remove accumulated road dirt and take a very thin layer off the old paint to lessen the difference, as well as improving the surface of the new paint. It is best to leave any new paint to harden for at least a fortnight before cutting it back.
lJnderneath the car, particularly within the wheel arches but also along the floor outer edges and heater channels, mud accumulates and should be cleaned off at regular intervals. Mud not only holds moisture in contact: with the car body for long periods but it holds the salt which is used on roads in the UK in winter. Little accelerates rusting faster than salt.
fSteam cleaning is the very best way in which to remove mud from the underside of the car, although most people make do with a powerful jet of water. High pressure cleaners can also remove undersea! which no
longer adheres to the metal due to the spread of rust underneath. Far from being a problem, this is a great help because it gives you a fighting chance of dealing with the rust at the earliest opportunity. You can hire such washers by the hour or day from many DIY and equipment hire businesses. If you do use one then make sure you have rust-arresting primer and some underseal to deal with the rusted areas which will be exposed.
Washing the car regularly not only keeps it looking good but also helps to show up any scratches or minor dents which could, if left untreated, lead to the onset of corrosion. It is a good idea to begin by washing the
underside of the car and the wheels, because the use of a hose or high-pressure water device can splatter mud all over the place, including onto the paintwork you have just washed if you did things in the wrong order. The head of a stiff broom can be a help in removing mud from under the floorpanlheater channel areas, where it can be difficult to direct a jet of water. After cleaning the underside, switch your attentions to the roof and then work downwards.
Never use ordinary washing-up liquid to wash the car, because many liquids contain industrial salts! (Do not use them in the windscreen washer bottle, either, because some of this soapy water will find its way onto the paintwork). It is always safest to use a proper car shampoo. Begin by hosing the car down with fresh water to get as much dirt as possible into suspension and off the body. If you take the wash leather or even a sponge to bodywork covered in gritty dirt then the dirt will grind at the surface of the paint. Begin with the roof, work along the bonnet, down the back and sides and lastly do the valances.
After this initial hosing or washing down it is as well to use a chamois leather and repeat the exercise, gently helping dirt from the surface with the leather, before applying the car shampoo and then rinsing this off.
At this stage you should thoroughly inspect the paintwork for any signs of damage and attend to these before polishing. If the paintwork is very dull then you might consider cutting it back before you polish it, using one of the several products for the purpose which are widely available from motor factors. Finally, polish the.. paintwork. Car polish repels water, so that water which is kicked up from the road (and which contains dirt) will wash away before the majority of the dirt has an opportunity to come out of suspension and stick to the paint.

BODYWORK PREVENTATIVE MAINTENANCE


You can extend the useful working life of your Beetle greatly by looking after the bodywork on a regular basis. Whilst it is true to say that no matter how badly rotted a car becomes, it can still be rebuilt (albeit at considerable cost), there can be no doubting that prevention is always less expensive and traumatic than cure, and this section of the book looks at ways of extending the life of the bodywork in order to put off that time when extensive bodywork rebuilding will be required.

Annual service


Carry out every task and check listed previously. The brake shoes and pads (disc brakes only) have to be checked for wear. Even if the car has passed the MOT braking test, this gives no indication of brake wear, only of braking efficiency. In the case of drum brakes, rather than peer through the hole in the backplate, remove the drum to permit a more thorough inspection. The brake drums should be cleaned. (See Chapter Four for more details of these operations.) Renew the sparking plugs and points. Renew the engine breather filter. Every eighteen months renew the brake hydraulic fluid (see Chapter Four). Every three years renew the brake hydraulic seals.

Check the fluid level in the brake master cylinder; if this is a little low then top up with new brake fluid. If the level is very low then fluid has been lost and the car should not be used until the cause has been identified and dealt with. (See Chapter Four.)Check the thickness of the lining of the pads/shoes. The minimum acceptable thickness is 1/8 in. (3 mm) for pads, and 3/10 in. (2.5 mm) for shoes.are approaching this thickness then it is as well to renew them. There are inspection holes in the brake backplate for checking the shoe thickness,if the brake pedal travel is too great and the handbrake is inefficient, the rear drum brakes will have to be adjusted. Note that later cars have self-adjusting rear drum brakes, and poor braking performance usually means that either the pads and shoes are contaminated or worn, or that some part of the mechanism is sticking.Drum brake shoes are supported at one end by the wheel cylinder pistons; these are pushed outwards so that the shoe presses against the drum when the brake pedal is pressed. At the other end the shoes are located in the adjusting screws. Adjustment is carried out by removing the two blanking plugs in each backplate, and using a straight-bladed screwdriver (an old screwdriver with a cranked end is better) to turn the star adjuster wheel for each shoe in turn. Adjust each shoe until the wheel is locked, then back it off until the wheel will turn freely.Operate both the handbrake and foot brake to centralise the shoes, then re-adjust the brakes if necessary; sometimes this process will have to be repeated several times before the shoes are correctly adjusted.Check the handbrake travel and adjust if necessary. When the handbrake is pulled up onto the fourth notch, the rear wheels should be locked. If not, then adjust as follows. If you have just adjusted the brakes, then pump the pedal to centralise the shoes. Pull the handbrake onto the second notch then remove the rubber gaiter from the bottom of the handbrake lever. Slacken off the locknuts on the cable ends, then insert a screwdriver into each cable end slot in turn to prevent it from turning whilst you tighten the nut. Adjust the cable end nuts so that equal pressure is felt on both. then test the handbrake by pulling it up to notch four and seeing whether the wheels are locked. Repeat if necessary and finish by tightening the locknuts and re-fitting the gaiter.If, in common with the author, you have difficulty in remembering which way to turn the adjusters in order to spread the shoes, try holding a nut and bolt by the adjuster so that the bolt head takes the place of the shoe end and the nut imitates the adjuster. By turning the nut you will see (there are no left-hand threads) whichway the bolt head moves and deduct whether to turn the adjuster up or down. The front adjusters are the more difficult to get at. and a cranked screwdriver will be a positive aid.

Transmission


Check the transaxle oil level. Park the car on level ground then remove the 17 mm hexagonal transaxle filler plug. If you don't have the correct tool for this, try making your own by bolting or preferably welding a17 mm bolt to a length of steel. If this is the first time you have attempted to remove the plug, you may find that it is very tight, in which case a hexagonal drive will probably be needed to start it. The oil should be level With this and, if not, top up. In the case of Stickshift itodels, a dipstick is provided to show the oil level: if this is low, then top it up using the correct fluid — Dexron 1 ir Dexron 2.The clutch travel should be checked and adjusted if necessary. There should be half an inch of free play. To adjust pedal travel, turn the large wing nut on the clutch operating lever, which can be found in front of the engine on the nearside of the car.Grease the nipples on the front suspension (beam axle). Using a pumping oil can, lubricate the door, bonnet and engine lid hinges and locks.Check the condition of the drive shaft joint gaiters and renew if necessary. In addition to being an MOT test failure point, split gaiters will allow water and dirt into the joints, where it will cause accelerated wear.

Carburation


The problem with attempting to adjust the air/fuel mixture at home is that there is no accurate method of objectively testing the results of your efforts unless you possess one of the small exhaust gas analysers which are today available for the DIY motorist. Now that exhaust gas is measured as part of the UK annual MOT test, it may be as well to ask that the mixture is set by the tester before your car is tested. Otherwise, it should not take too long nor cost too much to have this small job carried out professionally every six months. Even accurately setting the tickover (750 rpm for most models and 850 rpm for cars with semi-automatic gearboxes) requiresthe use of specialist equipment. However, if you wish to do the work at home, these are the basic principles. Begin by warming the engine then adjust the throttle adjusting screw (which bears against the throttle lever) until the revolutions rise to just under 1000 rpm (fast idle). Then turn the mixture control screw slowly clockwise until the point at which the engine begins to run erratically (the mixture is weak) and turn back by 60 degrees (one third of a complete turn). Re-set the tickover. As stated, it is best to have this work carried out by a professional with the aid of an exhaust gas analyser, and you would normally only carry out this adjustment following an engine or carburettor rebuild, in order to get the engine running well enough to make it to your local garage!In addition to the home exhaust gas analyser machines now available, a number of devices are advertised to make setting mixture easier. Chief amongst these is the Colourtune system, which uses a special spark plug which allows you to see the combustion colour and adjust the mixture to obtain the correct colour and hence the appropriate mixture.Still on the subject of fuel, check the fuel tank and lines for leakage.

Dynamic timing


The points made regarding the crankshaft pulley timing marks (or lack of the same) are equally appropriate to dynamic timing. If you are unable to establish where the timing mark should be then consult a good workshop manual or preferably have the job attended to professionally. If you take the latter course then the person who carries out the test will make a timing mark on the crankshaft pulley, which you can later make permanent with a centre punch for future reference! Assuming that you can establish the correct timing mark, proceed as follows. Disconnect the vacuum advance pipe from the carburettor. Highlight the timing mark using typists' correction fluid. Disconnect plug lead number one and connect the two leads from the stroboscope to the lead and plug respectively. Start the engine and shine the strobe onto the spinning crankshaft pulley. The stroboscopic light will flash every time number one spark plug fires, and appear to arrest the motion of the crankshaft pulley so that you can easily compare its position relative to the crankcase join t.11 the notch or other timing mark appears to the left of the crankcase joint then switch off the engine and retard the ignition by moving the distributor slightly in the direction of the rotor arms travel, or vice versa.

Friday, March 26, 2010

Figure I—Volkswagen


Figure I—Volkswagen—Left Front View
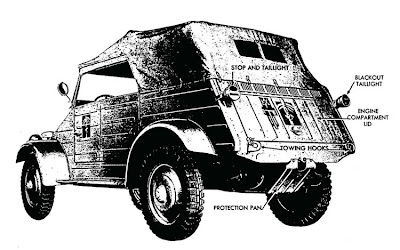
Figure 2—Volkswagen—Left Rear View

WAR DEPARTMENT Washington 25, D. C, 6 June 1944


WAR DEPARTMENT Washington 25, D. C, 6 June 1944
TM E9-803, German Volkswagen, is published for the information and guidance of all concerned.
BY ORDER OF THE SECRETARY OF WAR: G. C. MARSHALL, Chief of Staff.
OFFICIAL: J. A. ULIO, Major General, The Adjutant General.


PART ONE—INTRODUCTION
Section I. GENERAL
1. SCOPE.
a. These instructions are published for the information and guidance of the personnel to whom this equipment is assigned. Theycontain information on the operation and maintenance of the German Volkswagen as well as descriptions of the major units and their functions in relation to the other components of the vehicle.
b. This manual has the following arrangement.
(1) Part One, Introduction, contains description and data.
(2) Part Two, Operating Instructions, contains instructions for the operation of the vehicle, with description and location of the controls and instruments.
(3) Part Three, Maintenance Instructions, contains information needed for the performance of the scheduled lubrication and preventive maintenance services, and instructions for maintenance opera¬tions which can ordinarily be performed by using organizations (firstand second echelons).
c. The operations described in this manual are based on the availability of necessary parts, accessories, and tools. Conditions willarise in which the items referred to in the manual are not available since they cannot be requisitioned through usual channels. In thesecases, individual initiative must be resorted to when repairs are required.
2. RECORDS.
a. Forms and records which may be provided for use in performing prescribed operations are listed below with brief explanations of each. In case of Volkswagen, use of these forms will be governed by tactical situation and extent to which vehicle is employed.
(1) STANDARD FORM NO. 26, DRIVER'S REPORT—ACCIDENT, MOTOR TRANSPORTATION. One copy of this form should be kept with the vehicle at all times. In case of an accident resulting in injury or property damage, it should be filled out by the driver on the spot, or as promptly as practical thereafter.
(2) WAR DEPARTMENT FORM NO. 48, DRIVER'S TRIP TICKET AND PREVENTIVE MAINTENANCE SERVICE RECORD. This form, properly executed, is furnished to the driver when his vehicle is dispatched on non-tactical missions. The driver and the official user of the vehicle complete, in detail, appropriate parts of this form. These forms need not be issued for vehicles in convoy or on tactical missions. The reverse side of this form contains the driver's daily and weekly preventive maintenance service reminder schedule.
(3) W.D., A.G.O. FORM NO. 6, DUTY ROSTER. This form, slightly modified, is used for scheduling and maintaining a record ofvehicle maintenance operations. It may be used for lubrication records.
(4) W.D., A.G.O. FORM NO. 461, PREVENTIVE MAINTENANCE SERVICE AND TECHNICAL INSPECTION WORK SHEET FOR WHEELEDAND HALF-TRACK VEHICLES. This form is used for all 1,000-mile (monthly) and 6,000-mile (semiannual) maintenance services andall technical inspections performed on wheeled or half-track vehicles.
Section II. DESCRIPTION AND DATA
3. DESCRIPTION.
a. General. The Volkswagen is a four-wheeled, rubber-tired, rear axle drive personnel carrier and reconnaissance car, comparablein purpose and size to the American 1/4-ton 4x4 truck. No propeller shaft, as such, is used; the engine, transmission, and differential comprise a unit structure which is secured to the floor at the extreme rear end of the vehicle. Access to the engine is provided by a hinged door at the rear of the body. The vehicle has no frame. Instead, a base stamping comprising the floor of the vehicle is ribbed and provided with a central tunnel to give desired stiffness, to form the foundation of the vehicle. The main fuel tank is located under the front body panel on the right-hand side of the vehicle. The spare tire is carried on top of the front body panel.
b. Engine. The engine is an air-cooled, four-cylinder, four-cycle, horizontally-opposed type. Intake and exhaust valves are located inthe cylinder head and are operated by conventional rocker arms and push rods.
c. Transmission. The transmission is the selective, sliding-gear type. Four speeds forward and one reverse are available". Differingfrom American vehicles, no direct drive is used. The fourth speed forward is an overdrive, having a ratio of 0.80 to 1. A detailed description of the transmission is contained in section XX.

The distributor with its cap removed.

The distributor with its cap removed. Check the condition of the cap and the rotor arm. Remove the rotor arm to check the points condition and gap.

Various distributors are fitted to the Beetle; all share much the same design. ( Courtesy A utodata)


1.Condenser
2.Contact breaker arm
3.Securing screw with flat and spring washers
4.Insulating washer
5.Contact breaker point
6.Return spring
7.Breaker plate with earth cable
8.Plastic washer
9.Low tension cable
10.Distributor cap
11.Rotor
12.Distributor shaft
13.Steel washer
14.Fibre washer
15.Distributor housing
16.Vacuum unit
17.Distributor retainer
18.Sealing ring
19.Fibre washer
20.Shims
21.Driving dog
22.Pin
23.Circlip for driving dog
24.Shim

Static timing


Remove the sparking plugs, place the car in neutral and remove the distributor cap. Mark the plug leads as already described if you are unsure of which goes where.Turn the engine over until the rotor arm is pointing where number one cylinder HT lead terminates in the distributor cap (it will also be pointing at the notch in the distributor body rim). Place the two wires from your test lamp across the points. Turn on the ignition (NOTE; do not leave the ignition turned on for too long, becauseultimately this practice burns out the coil), then turn the engine backwards and forwards until you find the exact point at which the bulb lights. This is the point at which electricity flows to number one plug. At this point, the notch in the crankshaft pulley (single notch cars pre-1971) should be in line with the crankcase split, and the rotor arm should be in line with the distributor body rim notch. Cars made after 1971 which have a single crankshaft pulley notch are not so straightforward. The 1200 and 1300 notch denotes top dead centre (TDC) and there is no notch or other mark to indicate where the timing should be set. It is recommended that owners of these cars either consult a specialised workshop manual or, preferably, have the timing set professionally. The person who undertakes this work will make a temporary timing mark, which you can later make permanent (use a centre punch) for future reference! For cars with three notches on the crankshaft pulley, the centre notch should be used.
If the timing is incorrect, turn the engine until the appropriate notch lines up with the crankcase joint, then slacken the distributor clamp bolt. Attach the test lamp and switch on the ignition. Turn the distributor until you find the exact point at-Which the lamp lights, and fasten the clamp bolt whilst keeping the distributor in this position. Test and re-set if necessary.


The ignition system is one of those areas where the Beetle has a vast number of permutations regarding timing, points gap etc. A book which is primarily concerned with the subject of restoration cannot possibly cover all eventualities. Because of this, the author describes the principles of carrying out the work and advises the reader to obtain a good workshop manual to find the precise details for the car in question. Be very careful when ordering the manual; some publishers produce up to four different manuals for different years of Beetles.
Remove the sparking plugs and examine them. The nose should be a light fawn colour; if it is covered with a dry sooty layer then the engine has been running too rich, if it is covered with a sticky black layer then the


engine is burning oil, probably from the gap between a valve and its stem or past worn piston rings. If the plug ends have a glazed appearance then the engine is overheating and should not be run until the cause has been found and rectified. Check out the ignition timing and the fuel mixture for the cause of most overheating problems, and check especially for the usual causes of pre-ignition — air induction, weak mixture or timing too far advanced. Sooty or oil-fouled plugs may be cleaned and re-used; glazed plugs must be scrapped and replaced.
Clean the spark plug electrodes using a wire brush. The gap should be set using the appropriate tool at 0.23 in. (0.6 mm).
Next check the condition of the points. Remove the distributor cap and lift off the rotor arm. The points should be clean and should present flat surfaces to each other; if they are dirty then they may be gently cleaned; if they are pitted or if one has a hollow and the other a matching protrusion, they should be changed. In either case, the gap will have to be re-set.
Remove the spark plugs and take the car out of gear so that the engine may be turned over by hand. Turn the engine until the points cam is directly on top of a lobe and the points gap is consequently at its greatest. Place a 0.016 in. (0.4 mm) feeler gauge in the gap; it should enter easily with the tiniest amount of drag. If adjustment proves necessary, slacken the securing screw and adjust the points using a screwdriver in the notch provided. Tighten the securing screw then re­check.
It is advisable to check the ignition timing, and it is essential that the timing is checked after the points gap has been re-set. There are two methods of doing this; static and dynamic. The advantage of static timing is that no special tools save a 12V bulb test lamp are needed; the advantages of dynamic timing is that it also checks (where applicable) both the mechanical and the vacuum advance mechanisms, and it is inherently more accurate. To carry out a dynamic timing check you will require a stroboscope. These are low-cost items, but always try to obtain one which will give a reasonably bright light; some are so dim that you cannot see the timing marks by their light in normal daylight. You will also need some typists' correction fluid.

MAINTENANCE CHECKLIST


Engine
The engine oil and strainer should be attended to (never change the oil without also cleaning the strainer). The textbook method of changing the engine oil starts with the advice to warm the engine thoroughly in order to thin the oil and so help more of it drain. The author sees two drawbacks to this working method. Firstly, the oil (which plays a part in cooling the engine) will be very hot indeed and quite capable of burning you. Old engine oil can cause problems if it is allowed to come into contact with your skin; these will probably be exacerbated if you pre-heat the oil! Secondly, if the oil change is carried out after the car has been standing idle overnight, then the oil will have had plenty of time to drain down to the sump. Whichever method you choose is up to you.
You will need a receptacle for the old engine oil. You can buy special containers with deeply dished sides for this purpose, and they do offer you the advantage of being able to seal them once the oil has drained. However, an old five litre oil can, with one side cut away, serves just as well. Old engine oil is a very good rust preventative when painted onto steel surfaces. If you can find no use for the old oil, however, then dispose of it properly; most garages will accept it on your behalf for recycling.
To drain the oil, place the receptacle underneath the sump drain plug and then undo the plug. The oil will start to drain. To increase the flow rate, unscrew the oil filler cap. Leave the oil draining for fifteen minutes or longer if possible.
When the bulk of the oil has drained, you can attend to the strainer. The strainer assembly is to be found underneath the centre of the crankcase, where it is secured by six nuts. Place an oil receptacle under the strainer base plate (it will already be in the correct position on some cars, because the drain plug is situated in the centre of the base plate) and undo the nuts, taking care to keep oil off your hands.
Remove the strainer assembly. Clean off any of the old gasket material and wash the strainer in neat petrol. When refitting, use new gaskets.
Check the tension of the generator drive belt and, if it deflects more than % in. under firm thumb pressure, tighten it. To do this, lock the generator by inserting a thin screwdriver through the hole in the front pulley half against one of the screws in the generator, then remove the pulley nut. There should be a number of shims between the two halves of the pulley, and removing some of these will increase the belt tension (and vice versa). Keep the spare shims under the pulley nut on the outside of the pulley. If you do not save the shims and decide to fit a new belt (if the existing one becomes frayed or cut) then you will have to obtain and fit shims; otherwise the belt would be too highly tensioned and it would place unacceptably high strain on the generator bearings.
Disconnect the high tension (HT) leads from their respective spark plugs; if you are unsure about which plug connects with which lead then either place a folded masking tape tag on each lead and write onto this the relevant cylinder number, or mark 1,2,3 or 4 bands on each lead (according to which cylinder it runs to) itself using typist's correction fluid. The illustration shows the cylinder numbers (the pulley end is at the rear of the car, the flywheel is inboard) and the firing order.
The valve clearances have to be adjusted – happily, this is one of the few tasks which can be accomplished easily with the engine still in the car. Chock the front wheels, raise the rear of the car and support it on axle stands.
The engine should be cold. Begin by cleaning all dirt from the two rocker covers, and ensure that no dirt from nearby components can fall onto the valve mechanism. Disconnect the HT leads (mark them if appropriate with the relevant cylinder number to aid correct replacement) and remove the spark plugs. The rocker covers are held by spring clips, prise these away and lift out the covers. Take the car out of gear.Remove the distributor cap, then turn the engine until the rotor arm is pointing where the number one cylinder HT lead terminates in the distributor cap – do this either by pulling the generator drive belt or with a spanner on the generator pulley bolt (if the engine will not turn over then the drive belt is slipping and should be tightened before carrying on). The rotor arm should be pointing at a notch in the distributor body rim. Thenotch in the crankshaft pulley should be pointing upwards, in line with the crankcase centre join or, if there are two notches, they should be slightly to the right of this line.
Check the valve clearances for number one cylinder. Try to gently place a feeler gauge of 0.006 in. (0.15 mm) in between the rocker arm and the top of the valve stem; if it will not go in or if it is very slack then the clearance
has to be adjusted. Undo the locknut on the adjuster screw, then place the feeler gauge in position and tighten the adjuster screw until very slight drag can be felt on the gauge when it is moved. Remove the gauge, hold the adjuster in position with a screwdriver and tighten the locknut using a ring spanner. Re-check and re-adjust if necessary.
Turn the engine anti-clockwise until the crankshaft has gone through 180 degrees (the rotor arm will have travelled through 90 degrees and be pointing at the position of number two HT lead within the distributor cap). Check and, if necessary, adjust the clearances for number two cylinder. Repeat the anti-clockwise movement as before (rotor arm 90 degrees, crankshaft 180 degrees) and check and adjust the clearances for cylinder number three, then repeat the process for cylinder four.
There is also a quicker method, which must only ever be used when the engine is stone cold. Turn the engine over until the crankshaft pulley notch is at top dead centre. On one cylinder head, three rockers will have movement, on the other, just one. Adjust those valve clearances, then turn the crank pulley through a complete rotation, when the previously engaged rockers will now have movement; adjust the valve clearances of these.
Re-fit the rocker box covers, using new gaskets.

In addition to the tools listed previously, you will need a selection of straight and cross-headed screwdrivers, a grease gun, a selection of metric open-end or combination spanners (buy these as a set, preferably in a tool roll so that they can be kept in the car), and a spark plug spanner. You will need a feeler gauge; preferably one with a spark plug gap setter built-in. If you intend to check the ignition timing yourself then you will require a simple stroboscope. A pair of pliers and side cutters completes the tool list. If you can afford it, buy a '/2 in. drive socket set in addition to spanners. Other tools may be required if some of the checks made in this service reveal problems.
You will also require the following consumables: engine oil in the recommended grade, brake hydraulic fluid, distilled water and general purpose lithium-based grease, oil strainer gaskets, drain plug washer.
Carry out every task and check listed previously.

Monthly maintenance


In addition to the checks already listed for weekly inspection, the author believes that it is worth taking the time to check the thermostat. This is situated on the underside of the engine, offside of the car. Remove the four set screws and the cover plate.The purpose of the thermostat is to operate flaps in the ducted air cooling system; when the engine and thermostat are cold, the flaps remain in the closed position and limit the amount of cooling air delivered to the cylinders; when the engine and thermostat reach 65-70 degrees C then the thermostat should expand in length to 46 mm (1.8 in.), at which point the flaps will have fully opened and In addition to the checks already listed for weekly inspection, the author believes that it is worth taking the time to check the thermostat. This is situated on the underside of the engine, offside of the car. Remove the four set screws and the cover plate.The purpose of the thermostat is to operate flaps in the ducted air cooling system; when the engine and thermostat are cold, the flaps remain in the closed position and limit the amount of cooling air delivered to the cylinders; when the engine and thermostat reach 65-70 degrees C then the thermostat should expand in length to 46 mm (1.8 in.), at which point the flaps will have fully opened and

Weekly maintenance


Weekly maintenance consists of a set of checks and does not necessarily involve any work being carried out. The tool list is minimal. A jack is vital; scissors jacks are not recommended, a bottle jack is acceptable and a small trolley jack is ideal. The author does not favour the use of scissors jacks because, although they have the advantages of being lightweight and cheap to buy, they are not usually stable enough for any work save a roadside wheel change; for this purpose, their chief advantage is that they take up very little room within the car.
A jack is a purely a lifting device and it is not intended to be used as a support – never work on or under a car which is supported only by a jack – so you will need a pair of axle stands. These are not too expensive and last a lifetime. You also require a tyre pressure gauge and a tread depth gauge. A small stock of consumables is recommended; these being battery electrolyte, engine oil in the specified grade and brake hydraulic fluid. Firstly check the tyre pressures. Then chock both wheels on one side of the car, place the car in neutral and release the handbrake, then jack up the other side and support it on axle stands. Examine the tyres for cuts, bulges and tread depth. Look for the early signs of uneven tread wear; if the tread is wearing faster in the centre of the pattern than it is at the edges then the tyres have probably been over-inflated. If the tread wear is concentrated at both edges of the pattern then the tyre is probably under-inflated. If the tread wear is concentrated on one side of the pattern then the wheel alignment (tracking) requires adjustment, something which should be carried out professionally. If a tyre is faulty then replace it with the spare, and have the faulty tyre attended to. Repeat for the other side of the car.
Check the engine oil. The dipstick has two marks on it; one showing maximum level and the lower showing the minimum. Few people know the knack of pouring oil into a Beetle engine: decant the oil into a one pint milk bottle, offer it up to the filler neck then tip it up sharply. In addition to allowing you to fill the engine without covering the tinware with oil, this allows you to meter out precise quantities of oil. When pouring oil into the engine, bear in mind that the difference between the max and min marks represents just two pints of oil, so do not pour in too much at one go. Pour in a little, leave it for a couple of minutes to drain down into the sump, then re-check the level, topping up further if necessary. Take care not to over-fill the engine with oil, because too much oil can cause nearly as much damage as too little.
If the oil level is slightly low then top it up; if it has dropped substantially then the cause of the loss must be found at the earliest opportunity, and preferably before the car is used on the road. A car with a serious engine oil leak should not be used for any journey save the shortest run to a repair centre, and even for this it is advisable to tow the car in preference to driving it because engine damage can be very rapid once the oil level drops below a certain level. Remember that the oil in a Beetle engine is its liquid coolant; if the level is low then the engine will quickly overheat, which thins the oil and exacerbates the problems.
Check the fluid level in the brake reservoir (not applicable to early cars with mechanical brakes). If the level is very slightly down then top it up, if it is markedly low, then top it up but either trace and cure the leak yourself or have this done professionally at the earliest opportunity. If the level has dropped substantially then do not use the car on the road until the fault has been found and rectified. (See Chapter Four – Brakes).
Check the level of the water in the windscreen washer bottle (and the air pressure, which should be kept at around 40 psi in self-contained pressurised tanks – the spare wheel in cars which use the spare's compressed air to power the washer should also be kept at 40 psi) and top up if necessary. Do not use washing-up liquid in the bottle, because these liquids contain industrial salts which accelerate bodywork rusting. If desired, use a proprietary screen wash product.
Check the level of the battery electrolyte and top up if necessary. A substantial drop in the level (even in just one cell) means that the battery will have to be replaced.
Finally, check the tension of the generator drive belt. If this belt becomes too slack, it will not only fail to turn the generator (and so drain the battery), but it will also fail to turn the cooling fan and the engine will overheat. If the belt is too tight then it will place unnecessarily heavy loadings on the generator bearings. The belt should deflect by around 1/2 in. under firm pressure from your thumb. If the belt is too slack, adjust it as described later in this chapter.

Safety precautions


Never work on or under a car which is supported only by a jack or jacks – use axle stands to support the raised car, always on firm, level ground – and chock the wheels which remain on the ground to prevent the car from rolling off the axle stands. If you prefer to use a pair of ramps, make certain that they cannot topple before you climb under the car, and bear in mind that some ramps could be of poor quality or design and hence more likely to topple.
When using any combustible or flammable material or fluid (including paraffin, petrol and hydraulic fluid, bearing in mind that it is usually the fumes rather than the liquid which are the more dangerous) ensure firstly that there is no means of igniting it, such as cigarettes or electrical equipment which could cause a spark. Remember that most combustible fumes (note: petrol) are heavier than air and will quickly fill a pit.
Certain of the substances used in car maintenance and repair are very harmful to skin, eyes or if swallowed. Always wear the appropriate protective clothing and treat everything with a degree of caution.
Electricity presents special dangers. Apart from the physical dangers of electrocution, a stray spark can ignite any fumes present.
Although every precaution has been taken in ensuring that the working methods given in this book are safe, the author and publishers can accept no responsibility for any injuries or losses incurred whilst carrying out the tasks detailed in this book.

Whenever you drive the car


In principle, you should check that the lighting system (including the brake lights and indicators) is functioning before driving on the public highway. You should also check that the windscreen wipers, washer and horn are functioning correctly. You should in theory check that the tyres – including the spare – are properly inflated, although most people just check by eye that none of the tyres have deflated. Without conscious thought, the author always checks the 'feel' of the brake pedal, just in case a hydraulic or mechanical problem has occurred since the car was last driven. It is a good practice to get into the habit of carrying out these simple checks before driving on the road, because the majority of car •breakdowns apparently occur within a few miles of the car's base, and would therefore not happen if the car was checked before being driven those few miles!
The more pessimistic amongst us also check that no new pool of oil has appeared underneath the car since it was last used. All engines hate being driven with low oil levels, and the Beetle will reward such abuse with a
breakdown and possibly major engine damage within a very few miles!
Whilst you drive, listen to the sounds of the car on the move and, if you detect any new noises (or if an established noise suddenly stops) then investigate as soon as possible. Keep an eye on the oil pressure gauge or warning light as applicable, and if the warning light comes on (or the pressure gauge reading suddenly drops) then stop the car as soon as safe to do so and investigate.
You should always carry a small emergency tool kit in the car, even for short journeys. Many such kits can be found on the market, most coming in a handy tool roll or plastic container to keep all of the tools together. These should as a minimum requirement include pliers,-side cutters, straight and cross-head screwdrivers, plus an adjustable spanner or a small selection of open-ended spanners (make sure you buy metric spanners). Always buy the best quality tools which you can afford. Supplement your in-car tool kit with a roll of self-adhesive insulating tape and perhaps a few short lengths of wire, plus consumabl.es including spare 16 amp and 8 amp fuses and light bulbs. On long journeys, it is wise to also carry a quantity of engine oil, a spare generator drive belt and even spare ignition components.

Premises


It is a great help to have a warm, dry and well illuminated place in which to work, although all servicing can be carried out in the open. Avoid carrying out work in the rain, because water can cause problems with the ignition and electrical systems. A strong concrete surface over which you can park the car, raise it on a jack and support its weight with axle stands is essential.
Carrying out your own servicing at home can save a great amount of money compared with having it attended to by professionals. More importantly, you will be sure that all necessary jobs have been properly attended to, and that no unnecessary work or work which has not been done has been charged for. Many garages replace consumables such as brake shoes long before the components actually need replacing, and it is far from unknown for a few unscrupulous mechanics to charge the customer for certain work and parts but not to do the job because it is unnecessary.

MECHANICAL MAINTENANCE


The recommended six month/6000 mile service is quite involved, but within most people's capabilities. There is no harm whatever in attending to the more basic jobs yourself but leaving the more complicated tasks such as setting the ignition timing to professionals if you are unsure of your abilities. The more of the work you do yourself, the more money you will save.

Wednesday, March 24, 2010

MAINTENANCE


The Beetle is without doubt one of the easiest of all cars to maintain properly. The fact that the engine is air cooled means that there are no problems with sticking thermostats, leaky radiators and hoses, cylinder heads cracking when coolant freezes or worn water pump impellers. The mechanical components are simple, sturdy and long-lived; the ancillaries are often user-repairable or alternatively new or exchange reconditioned replacements can be obtained easily. Access to most of the components for servicing is better than on many cars, and in extreme cases when serious mechanical repair is found necessary, it is easier to get the engine and gearbox out of a Beetle than almost any other car.
Maintenance comprises a number of procedures which should be carried out at fixed intervals which are determined by either the number of miles travelled since the last service or the amount of time which has lapsed since then. Most maintenance procedures are concerned with preventative measures to prolong the life of the car and its components; some are concerned with making adjustments to maintain good fuel economy, smooth running and so on; many are checks to ensure that certain components (particularly the brakes, fuel and electrical systems) are functioning perfectly for safety reasons.
The price of ignoring proper service routines is that the car can become less safe to drive due to decreased braking efficiency, insulation breakdown on electrical wires or fuel leaks. A neglected car will also almost certainly show increased fuel consumption, and so skimping on maintenance does not save money! Furthermore, failure to check oil levels and to change the oil and clean the strainer, to check the ignition timing and carburation will shorten the useful working life of the engine. The engine oil is particularly important; with the air-cooled boxermotor, the oil plays a large part in cooling the engine and, if the oil level is allowed to drop then not only will lubrication suffer, but the resultant problems will be exacerbated byoverheating. Nearly all mechanical components will suffer increased wear and reduced life if maintenance is skimped.The majority of Beetles in existence are now old cars, and so there can be no hard and fast service intervals (recent imports excepted), because too much will depend on the age and condition of the individual car and the way and the conditions in which it is driven. A car which lives in dusty, very hot or very wet conditions or a car which is driven hard will require more attention on a much more frequent basis than a car which is kept in a garage and driven carefully. The service intervals given in this chapter are a general recommendation which should be taken as a minimum requirement for a car which is driven hard or in adverse conditions, and as having a margin of safety for cars which are driven gently.
The most frequent recommended service routines are concerned mainly with checking the efficiency of components, that everything (especially the electrics) works, and maintaining lubricant and hydraulic fluid levels. These routines are intended to give a framework which will ensure that potential problems are spotted at the earliest opportunity. A small problem, left unattended, can often quickly develop into a large and expensive to rectify problem. The most obvious illustration of this is when the oil level is allowed to fall to the point at which the engine overheats and eventually the big ends start knocking. Do not worry if you do not understand the terminology at this stage, for all will be made clear later in the book. Suffice to say for now that for the sake of topping up the oil, the engine has to be removed from the car and stripped down for an expensive rebuild.
For weekly service checks, little specialised equipment is needed unless the checks reveal problems which have to be attended to. With each service interval, the list of necessary equipment grows a little. However, all of the tools and equipment necessary to carry out all servicing on a Beetle can be bought at a fraction of the cost of a 'full' service from many franchised garages, so the expenditure is easily justified.

Service


The author would recommend that a full lubrication/ignition system service is carried out on any newly acquired car irrespective of any evidence of the fabled full service history or any claim by the vendor that the car is perfect and freshly serviced. Apart from giving you the peace of mind which comes from knowing that the job has been properly done, it might also unearth some latent fault which has so far escaped your attention. It also gives you a clean starting point for future servicing. (Details of how to carry out the various tasks are given in the following chapter.)
Change the engine oil and clean the strainer. Even better, clean the strainer then flush the system with a proprietary fluid before replacing the oil.
Top up the transaxle oil. Attack the car with a grease gun and fill every nipple until clean grease emerges, then wipe off any excess. Then get out the pumping oil can and attend to the hinges, locks, window winding mechanisms and so on.
It is advisable to change the brake fluid, not only to get new fluid pumping through the lines but also to check that the bleed nipples are not seized. Then adjust the handbrake and handbrake lever travel, and check the efficiency of the brakes against the engine before venturing out onto the public highway. To check the brakes you simply let the clutch pedal out slowly with the engine at tickover, the car in first gear and either the handbrake or footbrake engaged, ready to depress the . clutch pedal the moment that the engine begins to labour. If the engine does not labour then the clutch is slipping, unless the car happens to be moving forward, in which case the brakes are not functioning. Finally the tracking should be checked at any service centre.

VW New Beetle Dune--Interior--1280x960


Image Copyright Volkswagen Group
Before it even hit showroom floors in spring 1998, Volkswagen's New Beetle had do-it-yourself enthusiasts and potential buyers licking their chops for the opportunity to wrench every possible bit of horsepower and handling out of the dynamic, retro-looking package. The first comprehensive step-by-step, how-to performance handbook written specifically for owners of the New Beetle offers advice for upgrading engines, transmissions, suspension, and brakes, from inexpensive aftermarket tweaks to the ultimate street-performance parts and upgrades currently on the market. An authoritative text is accompanied by a wealth of explanatory photographs in both color and black-and-white. 8 ฝ x 10 ฝ, 128 pages, 150 color and 50 b&w photos

Interior


Lift the rear seat base and check the battery for condition (ensure it is the one you saw during your inspection of the car) and especially for security. Were a battery to tip over then at best leaking electrolyte will make a mess of paintwork – at worst an electrical fire could be the result. Check the wiring in the vicinity.
Check the seat belts by tugging quite violently; these are anchored to the tops and bottoms of the B posts; it's better to discover that the mountings are weak with rust (or have been bodged) at this stage than when you're headed towards the windscreen following a head-on crash – or even part-way through an MOT. Weak seat belt mountings make a car unroadworthy, so seek redress with the vendor.
Check the steering by feeling for lost movement –that is, movement of the steering wheel perimeter which does not move the front wheels. If it is much more than about 1 in. then check that none of the fixings in the steering mechanism have come loose. This can happen when a car has received attention to the steering prior to sale, but nuts and bolts have come loose since. Void steering wheel travel can indicate that the steering box components require adjustments (this is covered in Chapter Four). Also pull and push the wheel to check for play, and lift it then push down to check that the steering column fixings have not come loose.
Sit in each front seat in turn, grab the seat firmly and push down on the floorpan with your feet to check that the seat fixings and floorpans are sound.

General

Move the front wheels to full lock in each direction, and check that they don't foul the bodywork; it may be as well to 'bounce' each corner of the car to simulate suspension travel when you check this. If the front wheels do foul the bodywork, then the chances are that larger or wider wheels and tyres have been fitted; if both prove to be standard, then either extremely poor bodywork repair has resulted in badly aligned panels, or the front suspension geometry has been altered because the car has been involved in a front-end collision. In either case, confront the vendor with the evidence.

Engine compartment


Check firstly that the engine compartment and the underside of the engine transaxle are in the same sort of state that they were in when you examined the car prior to buying it; if everything was spotlessly clean then but is now covered with oil then there can be little doubt that either the engine and transaxle were steam cleaned for your inspection and that the test run (if any) was too short, or that this is clear evidence of skulduggery such as the replacement of the engine which you saw during your inspection with another. It is easy to perform an engine transplant on the Beetle.
Check the generator drive belt for deflection. Check that the tinware set screws are all in position and that they have been tightened correctly.
Trace back any mysterious lengths of wire which do not appear on the circuit diagram in your workshop manual; they are probably add-ons and might well at some stage in the future overload the fuse for the circuit they are tapping. A blown fuse might not at first sight seem too dangerous, but were your lights to extinguish whilst you were driving at any sort of speed on unlit roads then the consequences could be terminal. If you really wish to be thorough then pay special attention to all earth connections – most intermittent electrical faults can be attributed to poor earths.

Rear of the car


Whilst you have access to the rear underside of a Beetle, check the transaxle oil level and top up if necessary with the correct oil. If the oil level is low then keep an eye on it when you begin to use the car in case there is a serious leak.
Remove the thermostat cover (rear offside of the car) and measure the length of the thermostat both with the engine hot and cold. If the thermostat does not alter in length as the engine warms then the cold running flaps in the ducted air cooling system will not open, and the engine will overheat, causing accelerated wear and damage to the engine. (See Chapter Three for more details of this check.) Finally, check the torque of the nuts and bolts which hold the suspension together. Repeat the checks for the other side of the car.

Under the car

Begin by chocking one pair of wheels, loosening the wheelnuts and hub nut (drum brakes) on the other pair, disengaging the handbrake and taking the car out of gear, then raise the non-chocked side of the car and rest it on axle stands. Remove the road wheels and check the tyres for cuts, abrasions and bulges. Check the condition of the pads and examine the discs for scoring (disc brakes), back off the adjusters on drum brakes, remove the hub nuts and drums and check the shoes for wear, the drum for scoring, the backplate for oil or brake fluid contamination (hub seal or wheel cylinder seal kit needed) and (rear wheels) the handbrake components for free operation. With disc brakes, check for fluid leakage from the piston seals.
Check the dampers visually for signs of leakage and general condition. Check the brake hoses for bulges, cuts, abrasions or collapse. Gaiters on the drive shafts must be free from cuts, and will have to be replaced if they are damaged.
If you discover that any of these vital components have been swapped for worn-out alternatives following your inspection, then the best advice is to contact the vendor immediately and confront him/her with the facts, to contact your bank with a view to putting a stop on the cheque and, if the vendor denies any skullduggery, the trading standards office, police, any motoring organisation or owner's club to which you belong – anyone that you feel may be able to help.
Whilst the car is raised, take the opportunity to check the exhaust for signs of blowing, the visible sections of the fuel line for damage and the main battery/starter solenoid feed wire for signs of damage. Check any other wiring which runs under the car and inside the engine compartment. If you find any wires with damaged insulation then these need replacing before the car is used, and the battery earth should be disconnected there and then just to be sure that no wires can cause a short to earth.

After purchase


There is great temptation to load friends and family into a newly-acquired Beetle and set out on a long 'test' drive, but it is not the smartest way to begin your relationship with the car. It would be tragic if your car were to suffer a breakdown – or worse – a fault which leads to an accident on that first drive, and no matter how thorough your pre-purchase inspection of the car is, there is always a possibility that the car now possesses a serious fault or faults. For a start, you might have missed something so obvious that you will kick yourself when it leads to a breakdown in the future.
The vast majority of people are honest, but the vendor could turn out to have been a rogue. Perhaps Mister Vendor was less than scrupulous and forgot to mention the intermittent electrical fault which knocks the headlights out without warning or which used to occasionally blow a fuse which he up-rated so much that the fault is now fully capable of setting fire to the loom if the driver happens to switch on the wrong combination of electrical devices.
You could even discover that, during the period between your inspection and the collection of the car, the vendor has swapped some of the good components which passed your inspection standards for worn-out ones from another car – perhaps something as fundamental as brake pads or dampers. The components which might most typically attract this sharp practice are usually those which are reasonably easy to swap and fairly expensive to replace.
You could discover that the reason why the engine bay was spotless when you previously inspected it was because it had just been steam cleaned, and that plenty of fresh oil has by now found its way out of the engine during the drive home, leaving the engine oil level low.
It is better to begin your acquaintance with the new car in the workshop and give it a thorough check-over followed by a service. In addition to tools and consumables, you will need a good workshop manual.

Test drive

If the car has passed all of the tests so far, then a road test will enable you to discover many of the potential drive/suspension faults without getting your hands dirty.
The author and publishers can assume no responsibility for the consequences of any of the following advice. It is up to the individual to ensure that the car is driven in a safe manner with full regard to the safety of other road users.
If you are to drive the car then ensure that you will be not inadvertently break any motoring laws in the process. This means that the car must be roadworthy and taxed and that you must be properly insured. If the vendor is to drive, ensure that he or she is acting within the law, because you could be regarded as an accomplice if the vendor is stopped and charged of an offence by the police during the test drive.
For the sake of safety, begin at moderate road speeds and do not try anything fancy until you are satisfied that the road holding, handling and brakes hold no nasty surprises. If you are not familiar with the on-road behaviour of the Beetle then it is recommended that, if possible, you arrange for an experienced Beetle driver to carry out part or all of the test drive. The experienced Beetle driver will be able to detect problems with the engine, unusual noises from the drive train, deficiencies in the handling and braking which may not be apparent to the inexperienced.
If the car shows signs of 'floating' at speed then the dampers are worn; if the front of the car nose-dives as the brakes are applied, if the bonnet pitches up and down as the car moves away from a standstill, expect to find worn or leaking dampers. Any car with worn dampers is unsafe to drive at speed, so continue the test, if at all, at slow speeds.
On an empty stretch of road, brake to a standstill from about 30 mph and note whether the car pulls to one side (worn or contaminated brakes). If the brakes have to be 'pumped' before they will operate properly then there is air in the system. A clonk on braking could indicate suspension problems or a loose brake calliper (disc braked models only). If a clonk can only be heard when the car is first braked when travelling either forwards or in reverse, the calliper pistons, could be sticking. Repeat this test using the handbrake.
In all gears, accelerate and decelerate sharply to see whether the car can be encouraged (under provocation) to jump out of gear! If the car jumps out of first gear on the overrun then the chances are that the fault is due to incomplete gear engagement caused, in turn, by a wrongly positioned gear shift lever plate. Reverse the car a short distance and again brake to a halt, listening for clonks which could indicate suspension problems or a loose brake calliper.
If at any stage in these tests any doubts emerge regarding the brakes or suspension, then it is best to discontinue the road test on the grounds of safety.
Increase speed to normal road speeds and repeat the braking and gearchange tests, when any deficiencies in the engine, transmission or suspension not previously noted will be accentuated.Stop somewhere off the public highway. Engage the handbrake, then slowly let the clutch out, depressing it again immediately the engine begins to labour. If the car begins to creep forwards then the handbrake is out of adjustment or the rear brakes are worn or contaminated. If the engine does not labour appreciably then the clutch is slipping and in need of attention.
Slow down to 25-30 mph in fourth gear and press the accelerator pedal fully down. If the engine misses or shows hesitancy then this could indicate a weak mixture, as could pinking – otherwise known as pre-ignition. Pinking has a host of other possible causes including wrongly set ignition timing, an overheated engine, air induction or pre-ignition caused by very hot carbon or tiny metal burrs on the cylinder head which ignite the mixture ahead of the appropriate time. The sound of pinking is that of the pistons tipping in the bores. In time, pinking wrecks an engine. If the engine knocks, then it is almost certainly due for new big-end bearings and a crankshaft re-grind – in effect, a 'bottom end' rebuild or an exchange engine.
When exiting a corner check that the steering wheel returns to the straight ahead position; if not, then suspect partial seizure in the kingpins.

Friday, March 5, 2010

This flitch on a McPherson Strut car has been rebuilt


This flitch on a McPherson Strut car has been rebuilt — not necessarily a bad thing in itself as long as the patches are of sufficient strength to do the job — but the car should command a low price. The alternative to patching is to weld in a new flitch assembly; complicated, expensive and approaching the limits of practical restoration. With a new flitch, however, the car should
command a reasonable price.

Rot like this is all too apparent


Rot like this is all too apparent, but any bodyfiller bodging specialist can make the wing look like new, so check carefully. Note that the wing beading is the same colour as the wings, indicating that the car has received an 'economy respray. The stainless guard on the lower edge of the wine can actually trap water behind it, so that their value Jon- rust-prevention is questionable.

The fact


The fact that the bumper is badly dented points to front end collision (confirmed by the body filler in the bonnet), which in this case had placed slight corrugations in the flitch panel –these were easily beaten out. The collision has to be fairly substantial for this damage to happen. Don't confuse this still light crash damage with the damage which results from a really heavy front-end shunt. The latter will destroy Elie front-end panelwork and bend the suspension beams. The car to avoid most of all is the one with new panelwork.and bent beams – not always too easy to spot!

Project' about to enter through the inviting doors


Project' about to enter through the inviting doors of the workshop. Someone had to record this moment for posterity. From this angle, the car looks uninviting, and most buyers would turn the car down on its looks alone! Yet a few pounds of body filler and a quick respray could have made the car-look quite smart enough to find an uninformed buyer.

The base of the heater


The base of the heater channel has almost completely rotted away, showing the actual channel which carries the hot air to the front of the passenger compartment. Note the drain hole; moisture condenses out of the warm air from the heat exchangers when it passes down the heater channels. If you block up the drain hole, rusting will be rapid! New heater channel/sill assembly base repair panels are available, but be wary of buying a car repaired in this manner. The hidden heater channels will invariably be rusted and this would accelerate rusting of the new base plate.

Popular Posts